Extra inboxes for locations
Give a site, a site manager or a carrier account its own inbox address and send every bill it receives to one location.
In the app:Bill inbox
On this page
Your main inbox works for the whole company: each bill finds its location from what's printed on it. Sometimes it's simpler to give one site its own address. A site manager who gets the local internet bill, or a carrier account that only ever bills one branch, can send to an inbox that puts every bill on that location.
Extra inboxes are optional. Owners and admins add and change them; everyone else who can see the Bill inbox page can see and copy the addresses.
When an extra inbox helps
- A site manager receives bills for their site and should forward them without thinking about where they belong.
- A carrier account bills only one location, but its bills don't print an address Conduit TEM can match.
- You want to tell, at a glance in Recent emails, which bills came from which site. Each email shows "To" and the inbox's name.
If your bills already print each site's service address, and those addresses are on your locations, the main inbox places them for you. See Company structure.
Add an inbox
- Go to Settings → Bill inbox.
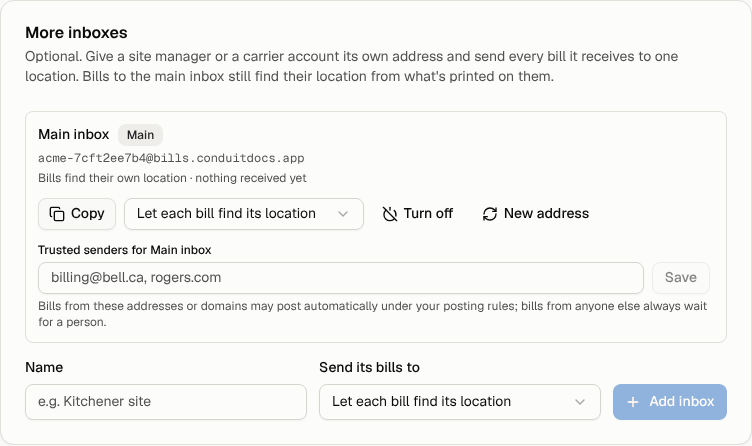
- In the More inboxes card, type a Name, for example "Kitchener site".
- Under Send its bills to, choose the location. Or leave Let each bill find its location to get a second address that places bills like the main one.
- Select Add inbox.
The new inbox appears in the list with its own address. Select Copy next to it and give it to whoever will send bills there.
Locations come from your company structure, so add the location under Settings → Structure first if it isn't listed.
How the location is used
Every bill that arrives at the inbox gets that location as its starting point. It works like choosing a location when you upload a bill:
- Lines with nothing more specific go to the inbox's location.
- A line the bill places more precisely still goes where it belongs: a placement rule, a cost-centre label, a printed service address that matches another location, or a service that already has a location.
You can still change any line's location on the review screen before you post.
Change or remove an inbox
For each inbox in the list, owners and admins can:
- Change the location with the drop-down next to it. New bills use the new location; bills already received keep theirs.
- Turn off the inbox to stop it creating bills. Emails are still listed as "Inbox turned off". Select Turn on to resume.
- Give it a New address. The old address stops working right away.
- Delete it with the bin icon. Emails to its address are ignored from then on. Bills it already received stay where they are.
Each inbox also has its own Trusted senders list. See Trusted senders and automatic posting.
Note: The main inbox is listed here too. It can't be deleted, and it normally stays on Let each bill find its location. You can point it at a location too, but then every bill sent to it starts on that location.
Related guides
- Your bill inbox
- Company structure
- Vendor accounts: an account's default location is another way to send its bills to one site.