Place cloud spend in your company
Send each cloud account's spend to a location, division or cost centre, and use tags to send spend to the right team whatever account it's on.
In the app:Cloud accounts
On this page
Cloud spend can be placed in your company structure, just like telecom bills. Each location, division or cost centre then sees its own cloud costs, and reports for one part of the company include them.
Owners and admins can change where spend goes. Everyone else can see it. If your company has only one location, there's nothing to place, and this page only lists the accounts.
See your cloud accounts
Open Cloud and select the Accounts tab. Every AWS account, Azure subscription and Google Cloud project from your uploads is listed with:
- the provider and the account's name and number;
- where its spend is placed (Company level until you choose);
- its latest month's spend and how much of it has no tags.

Accounts are added automatically when you import a cost file.
Place an account
- Select the account.
- Optionally, under Display name, type a clearer name (for example "Logistics routing" instead of "acme-logistics").
- Under Location or division, choose where its spend belongs.
- Optionally, under Cost centre, choose a cost centre. A cost centre is more specific, so the spend goes there.
- Select Save.

Everything already imported for that account moves at once, all its past months included.
Place spend by tag
Tags are labels your IT team puts on cloud resources, such as cost-center: CC-IT or team: logistics. A tag rule sends tagged spend to a unit, whatever account it's on. Tag rules come before the account's own placement.
There are two kinds of tag rule.
The tag names the unit. Use this when the tag's value is already a unit's code or name, such as cost-center = CC-IT.
- Under Tag rules, type the tag in Tag key, for example
cost-center. The list suggests tags found in your files. - Leave Value (optional) empty.
- Select Add rule.
Spend tagged cost-center = CC-IT now goes to the unit with code CC-IT, and spend tagged CC-SALES goes to CC-SALES.
One tag value, one unit. Use this when the tag's value isn't one of your unit codes, such as team = logistics.
- Type the tag in Tag key, for example
team. - Type the value in Value (optional), for example
logistics. - Under Goes to, choose the unit.
- Select Add rule.
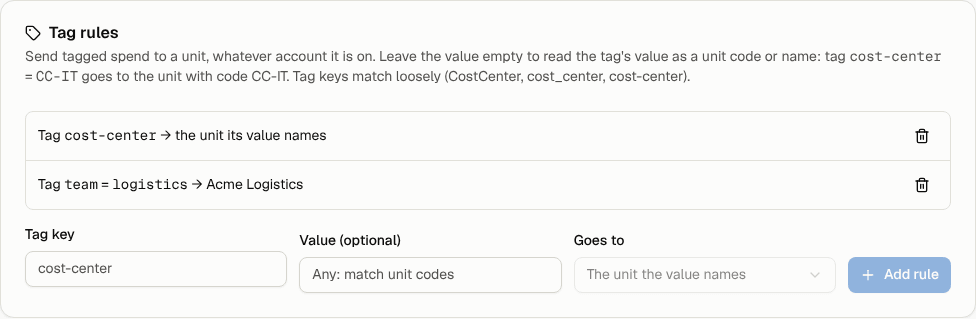
Tag names are matched loosely, so CostCenter, cost_center and cost-center count as the same tag. Upper and lower case don't matter in values. To remove a rule, select the bin icon beside it.
Where spend ends up
Conduit TEM uses the first of these that applies:
- a tag rule with a value;
- a tag rule whose tag names a unit;
- the account's cost centre;
- the account's location or division;
- otherwise, the whole company (Company level).
Spend at company level is counted in the company's totals. Members who can only see part of the company don't see it.
Tip: the Untagged spend figure on the Overview shows how much spend tags can't place. Ask your IT team to tag the biggest accounts first.